
How to Start a Personal Chef Business: Complete Step-by-Step Guide
The information presented in this guide is for informational purposes only and is not intended to constitute legal, tax, accounting, or business advice.
Starting your culinary career as a personal chef offers something most restaurant jobs can't: freedom, flexibility, and the chance to build a profitable business on your own terms. If you're wondering how to start a personal chef business, you're tapping into a booming industry valued at $16.88 billion in 2024 and projected to reach $31.48 billion by 2034.
Whether you're a culinary school graduate tired of restaurant hours, a passionate home cook ready to monetize your skills, or someone exploring a career change, this guide walks you through everything you need to launch successfully—from legal requirements to landing your first paying clients.
The best part? You can start a personal chef business with relatively low overhead compared to opening a restaurant or catering company. By cooking in your clients' homes, you avoid the massive costs of renting commercial kitchen space, buying expensive equipment, and navigating complex health department inspections.
Let's dive into exactly how to turn your culinary passion into a thriving personal chef business.
What Is a Personal Chef? (And Why It Matters)

Before we get into the logistics of how to start a personal chef business, let's clarify what a personal chef actually does—because the terminology matters for legal and operational reasons.
A personal chef operates as an independent contractor, running their own small business while serving multiple clients. You typically provide recurring services like weekly or bi-weekly meal preparation, cooking everything in your client's home kitchen. This is fundamentally different from:
- Private Chef: A salaried employee who works exclusively for one wealthy family, often living on-site or providing daily fresh meals
- Caterer: A business that prepares food in a commercial kitchen and delivers it to events or clients
The distinction is crucial because cooking in clients' homes generally exempts you from needing a commercial kitchen, health department inspections of your facility, and in many cases, collecting sales tax. This dramatically reduces your startup costs and regulatory burden.
Step 1: Decide What Personal Chef Services You'll Offer
Your first strategic decision is defining exactly what services you'll provide. This shapes everything from your pricing to your legal requirements to your target clients.
Common Personal Chef Service Models
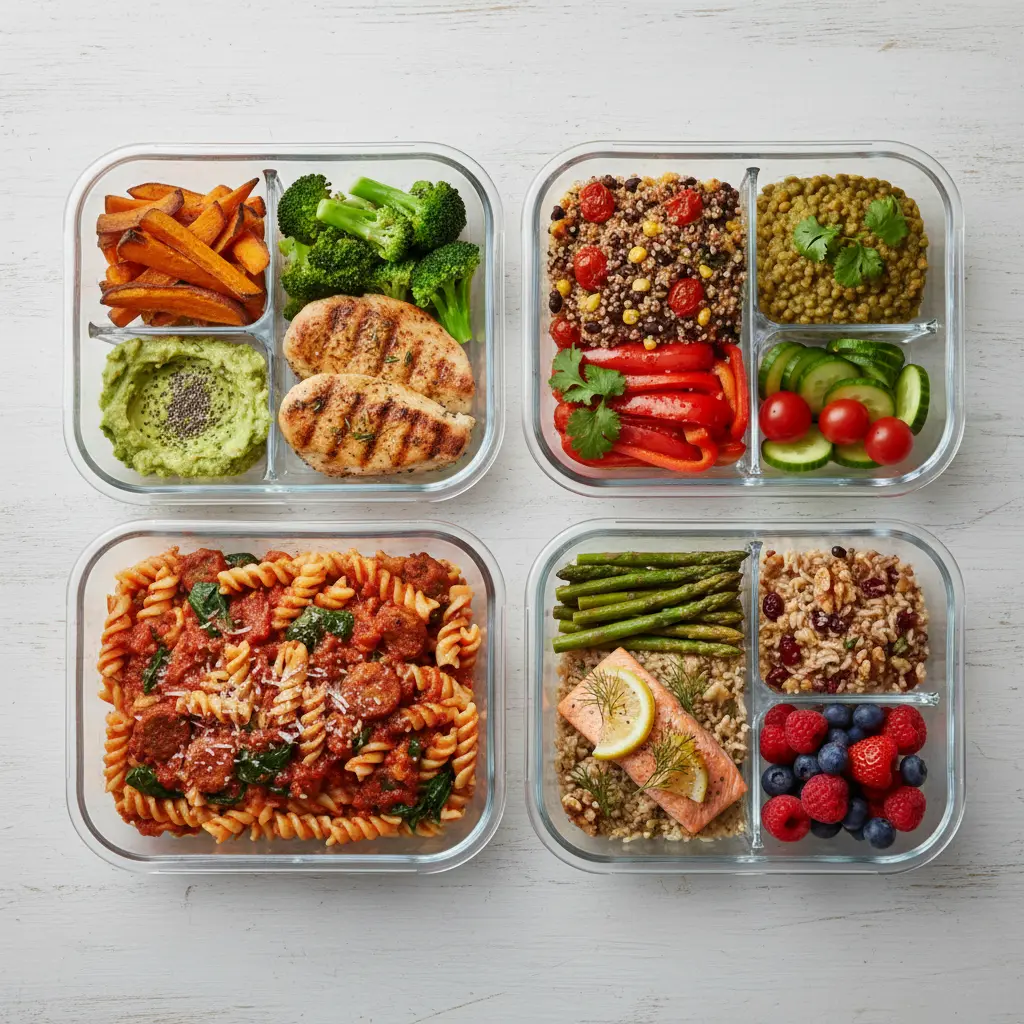
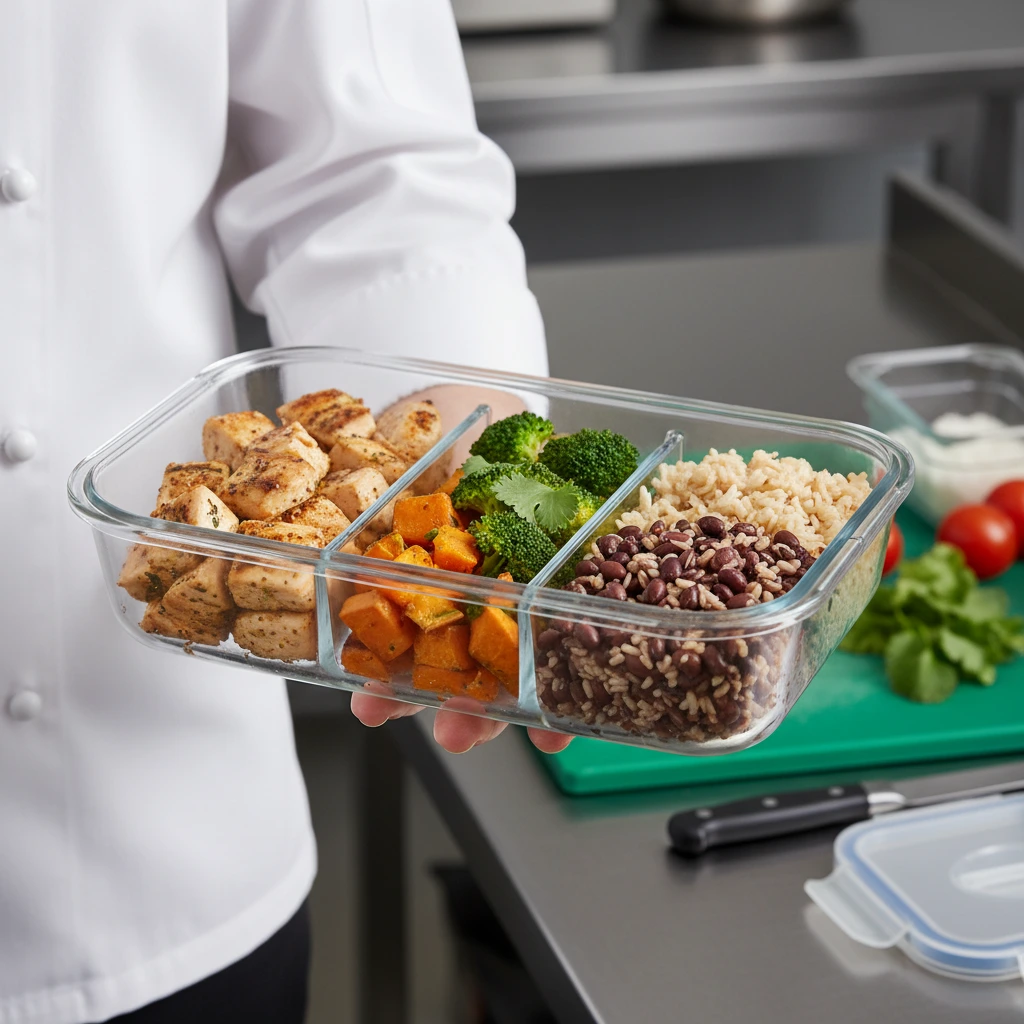
Weekly Meal Prep Services (Most Common for Beginners) This is the bread and butter of most personal chef businesses. You visit clients weekly or bi-weekly, spend 3-5 hours cooking in their kitchen, and prepare multiple meals they can reheat throughout the week. Clients typically want 4-6 dinner servings, though some also want lunches or specific dietary meals.
Special Dietary Needs Specializing in specific diets can command premium rates and reduce competition. Consider focusing on:
- Keto, paleo, or other low-carb diets
- Vegan or vegetarian cuisine
- Food allergy accommodations (gluten-free, nut-free, dairy-free)
- Medical diets (diabetic-friendly, renal diet, heart-healthy)
- Senior nutrition (easy-to-chew meals, specific nutritional needs) The senior market is particularly promising, with demand growing at 7.5% annually. Seniors often face mobility challenges that make grocery shopping and cooking difficult, plus they frequently need specialized diets for chronic conditions. This creates stable, recession-resistant demand.
Intimate Dinner Parties These one-off events involve creating a restaurant-quality experience in someone's home. You might prepare a multi-course tasting menu for an anniversary, handle a small dinner party for 6-10 guests, or create a special celebration meal. These command higher per-person rates ($90+ per person for upscale events) but require more intensive planning and service. This can also require additional equipment expenses like upscale plates, glasses, and table settings.
Cooking Lessons Some personal chefs supplement income by teaching clients cooking techniques, knife skills, or specific cuisines. This works especially well if you're building rapport with meal prep clients who express interest in learning.
Choosing Your Niche (Why Specialization Helps)
As a beginner, you might be tempted to offer "everything to everyone." Resist this urge. Specialization helps you:
- Stand out in online searches (people search for "keto personal chef" or "vegan meal prep chef")
- Command higher rates as an expert rather than a generalist
- Streamline your operations (buying similar ingredients, perfecting specific recipes)
- Build targeted referral networks (partnering with nutritionists, diabetes educators, etc.)
You don't need to pick only one niche, but starting with 1-2 specialties makes marketing easier and helps you build expertise faster.
Starting With No Equipment: Using Client Kitchens
One of the biggest advantages of the personal chef model is that you primarily use your clients' kitchens. This means you don't need to invest thousands in commercial equipment upfront.
What you DO need:
- Professional knife set (chef's knife and paring knife minimum - budget $50-150)
- Digital instant-read thermometer for food safety ($20-40)
- Insulated bags/coolers for transporting groceries ($40-100)
- Your own dish towels (bring 1-2 per hour of service)
- Small items often missing in home kitchens (measuring cups, graters, etc.)
Total startup equipment cost: $200-400 for basics
Most clients have the major equipment you need—stoves, ovens, pots, pans, mixing bowls. You supplement with your professional tools and fill gaps where needed.
If you are doing meal prep, clients often won’t have enough storage containers for the food.
However, it’s typical to ask the client to buy the containers themselves and have them available for you when you come to the home. Be ready with a recommendation of what containers to buy; clients will appreciate your expertise and not needing to search themselves.
It’s typical to evaluate a client’s kitchen during an initial consultation to make sure it will have everything you need — more on that later!
Step 2: Set Your Pricing
Getting your pricing right is critical. Price too low and you'll work yourself to exhaustion for pennies. Price too high before you have experience and testimonials, and you'll struggle to book clients.
Understanding Your True Costs
Before setting prices, calculate what each service actually costs you in time and money:
Time Components (all billable):
- Initial client consultation: 30-60 minutes
- Menu planning and recipe selection: 30-60 minutes
- Grocery shopping: 1-2 hours
- Travel to client's home: 30-60 minutes (round trip)
- On-site cooking: 3-5 hours
- Cleanup: 30-60 minutes
- Invoicing and communication: 15-30 minutes
Total time per client visit: 6-10 hours (most beginners underestimate this!)
Direct Costs:
- Groceries (client reimburses, but you float the cost)
- Gas/mileage for shopping and travel
- Cleaning supplies you provide
Overhead Costs (monthly, divide by number of clients):
- Insurance
- Software subscriptions
- Marketing
- Equipment replacement
- Phone/internet
Choosing Your Pricing Model
There are 3 main pricing models that personal chefs use. As a beginner, it’s often easiest to just choose one that is best suited to your service (meal prep vs. one-time events).
1. Per-Person, Per-Meal Pricing (recommended for events)
This works well for one-time events like dinner parties. Industry standards:
- Casual dining/cocktail parties: $30-50 per person
- Standard multi-course dinner: $70-100 per person
- Upscale 4-5 course experience: $90-150 per person
Usually includes groceries, preparation, serving, and cleanup. Minimums often apply (minimum 4-6 guests or minimum total charge).
Example: "$95 per person for a custom 4-course dinner, minimum 6 guests = $570 minimum booking"
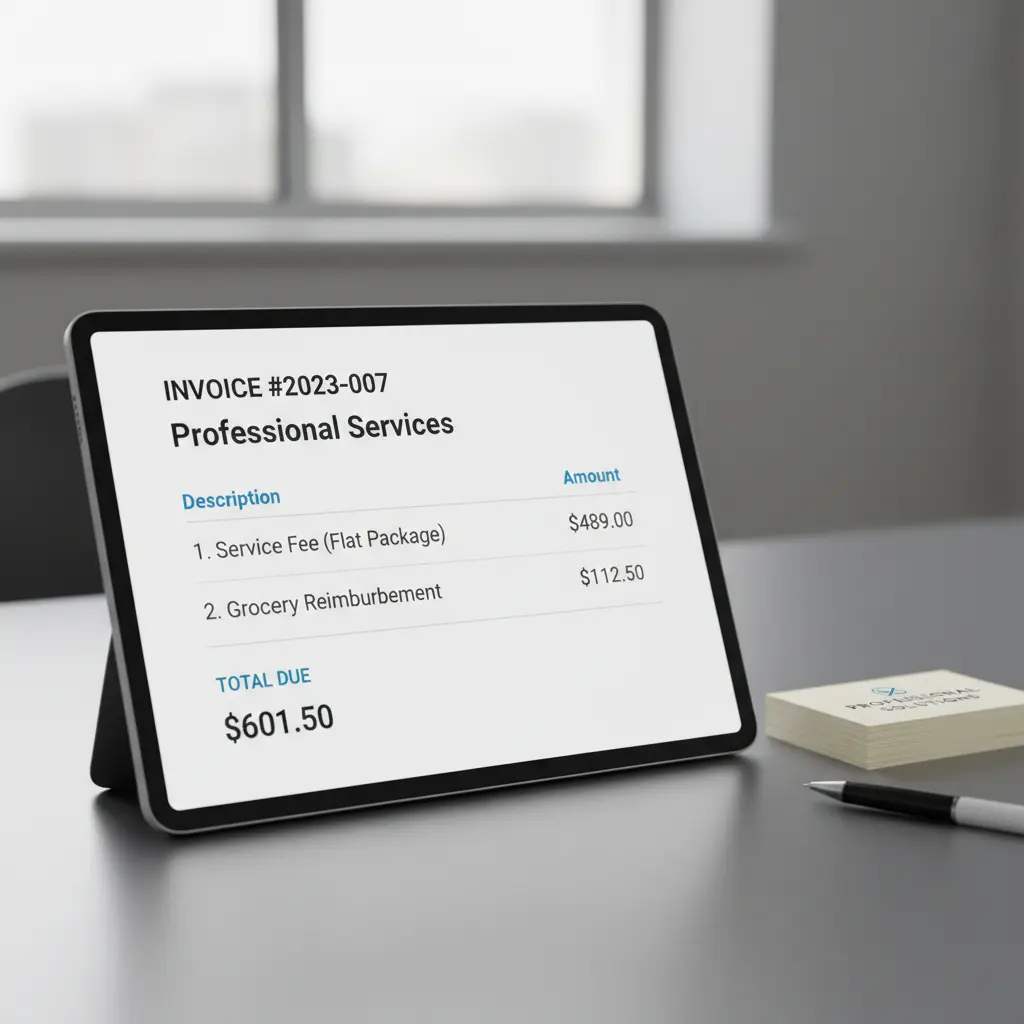
3. Flat Package + Groceries Pricing (recommended for meal prep)
This simplifies billing for regular weekly clients and creates predictable income:
- Weekly meal prep (20-24 servings): $400-600/week
- Typically, the price of groceries is not included. Groceries are reimbursed separately.
Example: "$489 + cost of groceries for weekly meal prep, providing 5 dinners (4 servings each)"
3. Hourly Rate Plus Food Costs (not recommended)
You might think that it’s easiest to charge clients an hourly rate for your services, plus the costs of food. While this seems like a reasonable choice, it often causes confusion and hesitation for clients. No one wants to think they’re paying $300 and end up paying $600 because they didn’t understand how many hours of the chef’s time the service would take!
Instead of directly charging your clients an hourly rate, calculate your own hourly rate per service and use it to create a flat package pricing structure. For example, if you want to make $50/hr and your meal prep service (including all non-cooking time!) takes 8 hours, charge the client $400.
Regional Pricing Research
Your location dramatically impacts what you can charge, making it important to research your local market:
- Check Thumbtack, Care.com, and local chef websites for pricing
- Join local personal chef Facebook groups and ask about typical rates
Should You Offer Discounts to First Clients?
This is strategic—done right, it accelerates your business. Done wrong, it devalues your service.
The "Beta Client" Strategy (Recommended):
Offer 25-40% off your full rate for your first 3-5 clients. In exchange, explicitly ask for:
- Detailed testimonial after each service
- Permission to use photos of the meals you prepare
- Permission to use them as a reference
- Honest feedback to improve your service
Frame it properly: "I'm building my personal chef business and looking for 3 clients to work with at a discounted rate of $X (regularly $Y) in exchange for testimonials and photos for my portfolio. Interested?"
This accomplishes three things:
- Gets you paid while you learn (never work for free)
- Builds social proof you desperately need as a beginner
- Sets the expectation that your real rate is higher
When to raise rates:
- After your first 5-10 clients (you now have experience)
- When you're consistently booked (demand exceeds supply)
- When you add certifications or specializations
- At the start of each year for existing clients (give 30 days notice)
Most successful personal chefs raise rates 10-20% annually as they gain expertise and demand.
Step 3: Meeting Legal Requirements—What You Actually Need

Let's cut through the confusion about licenses, permits, and regulations. The legal requirements for personal chefs are actually more straightforward than you might think, especially compared to opening a restaurant.
The Core Regulatory Advantage
Here's the key distinction: When you cook in a client's private home, you're generally exempt from health department kitchen inspections and commercial food facility licenses.
This is because you're providing a service in a private residence, not operating a public food establishment.
This exemption is your biggest financial advantage—it's why you can start this business without $50,000+ in commercial kitchen setup costs.
What You Actually Need to Operate Legally
1. Business License/Registration: Almost every city and county requires a basic business license to operate legally within their jurisdiction. This might cost $50-200 annually depending on your location. Check the website of your local city clerk's office or county business licensing department to determine exact requirements.
2. Food Handler's Certificate: You need proof that you understand food safety. Most states require a food handler's or food manager's certification like ServSafe. These courses cost $15-150 and can be completed online in a few hours to a few days. Key topics covered:
- Safe food temperatures
- Cross-contamination prevention
- Proper hand washing and sanitation
- Allergen awareness
3. Business Structure (Sole Proprietor or LLC): You can start as a sole proprietor—the simplest option where you and your business are legally the same entity. However, forming an LLC (Limited Liability Company) is strongly recommended because it protects your personal assets (house, savings, car) if someone sues your business.
LLC filing costs vary by state and county. For example:
- Florida: $125 filing + $138.75 annual renewal
- Georgia: $100 filing + $50 annual renewal
- California: varies by county + $300 annual renewal
- New York: $200 filing + $9 biennial renewal
Most states let you file LLC paperwork online in 30 minutes. You'll also need a “registered agent,” which is an individual or company that receives important legal and government documents on behalf of a business. This can be yourself at your home address in most states.
4. EIN (Employer Identification Number): This free tax ID number from the IRS is required if you form an LLC or plan to hire employees. Even if neither applies, getting an EIN is smart—it lets you open a business bank account and keeps your personal Social Security number off business documents. Apply free at IRS.gov.
5. Business Bank Account (optional but recommended): While you don’t legally need a business bank account to operate your personal chef business, it makes sense to open one. It makes taxes and bookkeeping easier, and it makes your business look more professional to clients. You’ll need your business formation documents and EIN to open an account. Look for a bank with no monthly fees, easy mobile deposit for client checks, and business debit/credit card options.
5. Insurance Coverage (Non-Negotiable) While technically not a legal "license," insurance is absolutely essential before you cook your first meal for a paying client. Given that you're working in high-value private homes and handling food preparation, insurance isn't optional—it's your financial safety net.
General Liability Insurance is your foundational protection. This covers you if:
- A client or guest trips over your equipment bag and gets injured
- You accidentally damage a client's expensive countertop or appliance
- Someone claims property damage occurred while you were working
The good news? It's surprisingly affordable. General liability coverage typically costs ~$300 annually (roughly $17-42/month) for small personal chef businesses.
Professional Liability Insurance (also called Errors & Omissions) protects you against claims of professional negligence:
- A client claims you didn't follow their dietary restrictions properly
- Someone alleges your service caused them financial loss
- A client says the meals weren't what they paid for
Many insurance providers specifically recognize "Personal Chef" as a covered profession, making it easy to get appropriate coverage.
Providers like NEXT Insurance, Hiscox, and Thimble offer affordable policies designed specifically for food service professionals. Many policies can be purchased online in minutes.
Some professional associations like the United States Personal Chef Association (USPCA) include liability insurance as part of their membership package, which can be a cost-effective way to get both training resources and coverage.
When You DON'T Need a Commercial Kitchen
This is crucial: You don't need a health-department-approved commercial kitchen if you only cook in clients' homes and don't prepare food elsewhere for delivery.
The moment you start cooking meals in your home kitchen or another location and delivering them, you cross into catering territory and need:
- Health department approval of your prep facility
- Regular health inspections
- Potentially a separate business kitchen (can't use your regular home kitchen in many states)
- Catering licenses
Stick to cooking on-site in clients' homes when starting out to avoid this regulatory and financial burden.
State-Specific Considerations
While the basic pattern holds across most states (business license + food safety cert = you're good for on-site service), some states have quirks.
Always verify current requirements with your local health department and business licensing office, as regulations can change and vary by county.
The Sales Tax Question
This gets complex and varies by state, but here's the principle: In many jurisdictions, if you're only charging for your labor/service time and the client reimburses you separately for groceries, you may not owe sales tax. However, if you purchase ingredients and include them in your service fee (marking up the food), you're often required to charge sales tax.
Example from New York: If you buy ingredients and use them to prepare meals, it's considered catering and subject to sales tax. But if the client provides ingredients and you're only billing for cooking time, it's a non-taxable labor service.
The strategic approach: Structure your invoicing to clearly separate your service fee (labor, consultation, menu planning) from grocery reimbursement. This often minimizes tax complexity while keeping things transparent for clients.
Consult with a local accountant familiar with food service businesses to structure this correctly for your state. Pro tip: check out your local Small Business Development Center (SBDC) to see if they offer free accounting consulting services.
Step 4: Set Up Your Basic Business Operations Systems

Professional systems separate successful personal chefs from those who burn out in year one. You're not just a cook—you're running a business that requires organization.
But too much planning and organization upfront can leave you with the opposite problem: never actually starting to cook for clients! Here are the basics to set up before your first client, plus some things you don’t need yet but will want as your business grows.
What You MUST Have Before Your First Client:
1. Payment Processing System You need a simple, reliable way to accept payment and—critically—document every transaction for tax purposes. Many personal chefs start with Venmo for Business, PayPal, Zelle, or checks.
Whatever method you choose, keep meticulous records. Create a simple spreadsheet or use your phone's notes app to log every payment received: date, client name, amount, and what it was for (service fee vs. grocery reimbursement—remember that tax distinction!).
As you grow, you'll want dedicated invoicing software, but don't let the lack of a perfect system stop you from getting paid for your first gig.
2. Google Business Profile (Free Review Collection) Before you cook your first meal, claim your free Google Business Profile. This takes 10 minutes and becomes your most powerful marketing tool. After your very first service, you’ll want your client to be able to leave you a glowing review.
Why it matters: When people search "personal chef near me" or "meal prep chef [your city]," Google shows local businesses with reviews. Having 3-5 glowing reviews after your first clients makes you look established and trustworthy. How to set it up:
- Go to google.com/business
- Enter your business name and service area
- Verify your business (usually by postcard or phone)
- Add your services, hours, and photos
3. Client Service Agreement (Protect Yourself) Never cook without a signed agreement. This isn't about being litigious—it's about setting clear expectations and protecting both you and your client.
Your agreement should include:
- Services provided: Exactly what you'll do (number of meals, servings, cooking time)
- Pricing and payment terms: Your service fee, how grocery costs are handled, when payment is due
- Dietary restrictions and allergies: Client is responsible for communicating all restrictions, allergies, and preferences in writing
- Kitchen requirements: Client must provide a functional kitchen with working appliances and adequate space
- Cancellation policy: What happens if client cancels (48-hour notice recommended, deposit non-refundable within 48 hours)
- Limited liability clause: You're not liable for issues beyond your control, provided you follow proper food safety protocols
You can find personal chef contract templates online or have a simple one drafted by a local attorney for $300-500. This is money well spent.
Use a digital signature tool like DocuSign (free for basic use) or HelloSign to make signing seamless. Clients can sign on their phone before you shop.
4. Menu Planning and Recipe System You need a way to plan menus, generate shopping lists, and access recipes on-site. This doesn’t need to be complicated! You can start with simple choices like Google Docs, a notes app, or photos on your phone. Some chefs also prefer to start off with everything in an optimized recipe app. Apps like Meals Hero automatically create shopping lists organized by store section, which saves you time and makes sure you don’t show up without a critical ingredient.
What You DON'T Need Yet (Save This for Later)
1. A Professional Website
Yes, eventually you'll want one. But for your first 5-10 clients? It's not necessary and can become a procrastination trap. Your first clients will also help you get testimonials to use on your website later.
2. Business Cards, Branded Aprons, or Fancy Packaging These feel productive but don't generate clients. Your food and service quality generate clients. Skip for now:
- Custom logo design
- Branded aprons or chef coats
- Printed business cards
- Fancy meal prep containers with your logo
You can work on your branding later—it’s a fun milestone to buy that branded apron when you’ve hit your 10th successful service!
Step 5: Find Your First Client

Here's the classic catch-22 of starting a personal chef business: Clients want to see testimonials and reviews before they hire you, but you can't get testimonials until you have clients.
This is why your first 3-5 clients are absolutely critical. They're not just revenue—they're the foundation of your entire marketing strategy. These initial clients provide:
- Testimonials that prove you deliver great service
- Google reviews that make you visible in local searches
- Photos of real meals you've prepared for real families
- Referrals to their friends and networks
- Feedback that helps you refine your process
The good news? You can break this cycle with a strategic "beta client" approach: offering a limited number of discounted services in exchange for reviews, testimonials, and honest feedback.
Before you start: If you've cooked for people in the past—dinner parties for friends, meal prep for a neighbor recovering from surgery, holiday meals for family—reach out and ask them to leave you an honest review on your new Google Business Profile. They shouldn't lie about hiring you as a personal chef, but they can absolutely review the quality of your food, your reliability, and what it was like having you cook for them. Even 2-3 initial reviews make a massive difference in credibility.
Your First Client Should Be Someone You Know
Starting with “warm leads”—people who already know and trust you—is the fastest path to your first paying client. Here's why this strategy works:
Warm leads are ideal for beginners because:
- They're more forgiving as you refine your process and systems
- They're more likely to give honest, constructive feedback (not just complaints or silence)
- They'll enthusiastically refer you if they're happy with the service
- There's less pressure than cooking for a stranger who found you online and has high expectations
- They understand you're building something and want to support you
Who to approach first:
Make a list of 20-30 people in these categories:
- Friends and family (but always charge them—more on why below)
- Coworkers or former colleagues (especially those who complain about not having time to cook)
- Neighbors (particularly busy families, new parents, or seniors)
- Members of your church, gym, or community groups
- Parents from your kids' school (PTA meetings are goldmines)
- People in your social media network who've expressed interest in meal prep or healthy eating
The pitch: What to say (and what to ask for)
You need to be direct and specific. Here's a proven script you can customize:
Text/Email Template:
"Hey [Name]! I'm excited to share that I'm officially launching my personal chef business. I'm looking for 3-5 families to work with at a special introductory rate while I build my portfolio. Here's what I'm offering:
- [Weekly meal prep: 4 dinners, 4 servings each] OR [Private dinner party for up to 8 guests]
- Custom menus based on your preferences and dietary needs
- All cooking done in your kitchen
- Complete cleanup
Regular rate: $500/week Your rate: $250/week (50% off) In exchange, I'm asking for:
- A testimonial after your first service
- A Google review after 2-3 services
- Permission to photograph the meals
- Honest feedback to help me improve
Interested? I have [3 spots] available and would love to work with you!"
For in-person conversations:
"I'm starting a personal chef business and I'm looking for a few families to work with at a discounted rate while I build my portfolio. Would you be interested in having me cook [4 dinners a week / a special dinner party] in your home? I'd give you [X]% off my regular rate, and in exchange I'd just need a testimonial and Google review. What do you think?"
Important: Always charge, even friends and family
Never work for free. Here's why:
- Free work has no perceived value. People don't value what they don't pay for, and they're less likely to take the service seriously.
- It sets the wrong precedent. Once you cook for someone for free, they expect it forever.
- You need paying clients for legitimate testimonials. Reviews from paying customers carry more weight.
- You deserve to be compensated for your time, expertise, and expenses. Charge friends and family your discounted beta rate, but charge them something. You can always give them an extra generous referral bonus if they send business your way.
Local Community Outreach (Free Methods)
Once you've tapped your immediate network, expand to your local community using free platforms and old-school outreach.
Nextdoor: Your Local Marketing Goldmine
Nextdoor is specifically designed for neighborhood connections, making it perfect for personal chef services. People trust their neighbors' recommendations more than any advertisement.
To write an effective Nextdoor post, keep it personal, specific to your neighborhood, and value-focused:
"Hi neighbors! I'm [Your Name], and I live on [Street Name]. I've just launched a personal chef service here in [Neighborhood Name], specializing in [healthy meal prep / family dinners / dietary-specific meals]. I'm looking for 3 local families to work with at an introductory rate this month. I'll come to your home weekly, cook custom meals based on your preferences, and leave your fridge stocked with [4 dinners] ready to reheat. Perfect for: busy professionals, new parents, anyone managing a health condition, or families who want healthy home-cooked meals without the time investment. Offering a neighbor discount: $299/week (regularly $450) for my first 3 clients. DM me if you're interested or know someone who might be!"
Pro tips:
- Offer a specific "neighbor discount" (people love supporting local)
- Post in relevant Nextdoor groups like "Parents," "Seniors," or "Local Businesses"
- Update your Nextdoor business profile with your services
- Respond quickly to inquiries—Nextdoor shows response times
Community Facebook Groups
Facebook groups are free and highly targeted. Join 10-15 local groups and engage authentically before promoting your service.
Target these group types:
- Local mom groups (always looking for dinner solutions)
- Neighborhood-specific groups (your zip code or subdivision)
- Buy/sell/trade groups (check rules—many allow service posts on specific days)
- Diet-specific groups (local keto, vegan, gluten-free communities)
- Senior community groups
- Local fitness/wellness groups
First, follow the rules. Many groups have "Self-Promotion Sunday" or require admin approval.
Then, lead with value:
"Question for the group: Anyone else struggle to find time to cook healthy dinners after work? I just started a personal chef service here in [City] and I'm looking for feedback. What would make weekly meal prep worth it for you? Price? Specific diets? Number of meals?"
This opens a conversation. After people engage, you can respond with details about your service and intro offer.
Local Bulletin Boards (Yes, They Still Work)
Don't underestimate the power of a well-designed flyer in the right location.
Where to post:
- Coffee shops (especially independent shops with community boards)
- Public libraries (many have community announcement boards)
- Community centers and senior centers
- Grocery stores (Whole Foods, Trader Joe's, natural food co-ops often have boards)
- Yoga studios and gyms (wellness-focused audience)
- Pediatrician and dental offices (ask permission first)
What your flyer should include:
- Eye-catching photo of plated food
- Clear headline: "[Meal Prep] Services Now Available in [Neighborhood]"
- What you offer (weekly meal prep, dietary specializations)
- Your unique value (local, certified, specialized in X diet)
- Contact method (phone number on tear-off tabs)
- Introductory offer pricing
Word of Mouth: Tell EVERYONE
Your biggest marketing asset is you. Tell every single person you interact with about your new business.
The script:
"I just started a personal chef business! I cook custom meals in people's homes based on their dietary needs and preferences. Do you know anyone who might be interested? Busy professionals, new parents, anyone managing health conditions?"
Where to mention it:
- Your hairdresser or barber (they talk to everyone)
- Your doctor's office, dentist, physical therapist
- At your gym or yoga class
- Parents at school pickup
- Cashiers at your regular grocery store
- Your mail carrier, neighbors, HOA meetings
Asking “who do you know” is more powerful than asking "are you interested?" because:
- It takes the pressure off the person you're talking to
- Most people can think of someone even if they're not interested themselves
- Referrals come pre-sold on your service
Strategic Partnerships and Referral Networks
The fastest path to consistent, high-quality clients is building relationships with professionals who serve your ideal customers. These partnerships create a steady stream of warm referrals.
Think about who works with people who desperately need your services. Consider offering a special bonus for their clients, like an special discount.
Nutritionists and Dietitians
These professionals prescribe meal plans, but their clients struggle with execution. You're the perfect solution—you can bring their nutrition plans to life.
Nutritionists often charge $100+ per session. Their clients are already investing in their health and are pre-sold on the value of good nutrition. Many would gladly pay you to execute the meal plans they're already paying to receive.
You’d be surprised at how untapped this referral channel is! In a survey we did of 27 dietitians, only 3 knew a personal chef who they could recommend to interested clients. That means 89% of dietitians didn’t know who to refer their clients to!
Other Potential Health and Fitness Partners:
- Physical therapists (clients recovering from surgery need easy, nutritious meals)
- Personal trainers (clients serious about fitness need proper nutrition)
- Diabetes educators (diabetics need carefully planned, consistent meals)
- Occupational therapists (especially those working with seniors) How to approach these professionals:
Don't lead with "will you refer clients to me?" Lead with value for their clients:
"Hi [Name],
I'm [Your Name], a certified personal chef specializing in [therapeutic diets / sports nutrition / senior meals] here in [City].
I work with clients who have specific nutritional needs but struggle with the time or ability to execute their meal plans.
I'd love to be a resource for your clients. I can prepare meals based on nutrition plans you've developed, helping your clients actually follow through on your recommendations.
Would you be open to a quick 15-minute call? I'd love to learn more about your practice and see if there's a way we could support each other's clients.
Best, [Your Name]"
Other Strategic Partners:
- Real estate agents: They need closing gifts for high-end clients and services for home staging. Offer a "Welcome Home" meal prep package or cooking for open houses.
- Senior care coordinators and agencies: Many seniors need meal assistance. Partner with home health agencies, senior living facilities, and aging-in-place coordinators.
- Corporate wellness programs: Companies want to offer unique employee benefits. Propose a "meal prep benefit" or cooking class as a wellness perk.
- Wedding planners: Rehearsal dinners and intimate celebrations need food. You can offer a more personal, customized alternative to traditional catering.
What NOT to Do When Finding First Clients
Desperation for your first client can lead to bad decisions that hurt your business long-term.
Avoid these common mistakes:
Don't work for free. We covered this above, but it bears repeating. Free work devalues your service, attracts the wrong clients, and creates unsustainable expectations. Your time, expertise, and ingredients cost money. Charge for them—even if it's a deep discount for your first clients.
Don't accept clients without a signed agreement. No matter how nice they seem, no matter how desperate you are for the booking—never cook without a signed service agreement. This protects both of you and sets professional expectations from day one. The 10 minutes it takes to send and sign a contract could save you from disputes over payment, menu changes, or liability issues.
Don't take on clients with inadequate kitchens. If they don't have a working stove, barely any counter space, or a non-functional refrigerator, you can't perform quality service. Make sure to ask about:
- Stove type (gas or electric, number of burners)
- Oven functionality
- Refrigerator and freezer space
- Counter space for prep
- Quality of knives and basic cookware If their kitchen won't work, politely decline or help them understand what needs to be fixed first.
Don't say yes to everyone. Red flags to watch for:
- Extremely demanding or rude during initial contact
- Unwilling to pay a deposit or sign an agreement
- Constantly changing requirements or menu requests
- Expecting you to shop with no deposit or reimbursement structure
- Unclear about budget but expecting luxury service
- Bad reviews of other service providers on their social media Trust your gut. One difficult client can drain your energy and hurt your business more than the revenue is worth.
Don't discount below your costs. Before offering any discount, calculate your true costs:
- Minimum grocery spend per week
- Your hourly rate × total hours (including shopping, cooking, travel, cleanup)
- Gas/mileage
- Overhead (insurance, supplies, etc.)
Your discounted "beta rate" should still cover all costs and provide some profit. If you're breaking even or losing money, you're not running a business—you're paying to work.
Example: If your costs are $250, your absolute minimum is $250. Offering a beta rate of $175 means you're losing money on every client. Don't do it.
From Zero to Momentum
Getting your first client is genuinely the hardest part of starting a personal chef business. You're fighting the credibility gap with no reviews, no portfolio, and no track record.
But here's the truth that should motivate you: After you serve 5 satisfied clients, momentum builds naturally. Those 5 clients each tell 2-3 people. Those people check out your now-glowing Google reviews. Suddenly you're not chasing clients—they're finding you.
Remember: You're not looking for 100 clients. You're looking for 1 client. Then another. Then another.
Most personal chefs hit sustainable income with just 8-12 regular weekly clients. You don't need to be famous or have thousands of followers. You need a small group of people who value what you do and tell others about it.
Your first client is out there right now—probably closer than you think. Start with the person you're going to text as soon as you finish reading this section.
Ready? Go send that message. (Yes for real, right now.)
Step 6: Your First Client Consultation

You've booked your first client—congratulations! Before you start cooking, you need a thorough consultation. This 20-30 minute conversation is where you gather critical information, assess their kitchen, and determine if you're a good fit for each other.
Skip this step and you'll find yourself scrambling mid-service when you discover they have no working oven, or worse—someone has a severe allergy you didn't know about.
Why the Consultation Matters
The consultation accomplishes several critical goals:
- Understanding needs and expectations: You'll learn how many people you're cooking for, what dietary restrictions exist, and what their ideal weekly meal situation looks like.
- Assessing the workspace: You need to know if their kitchen is functional for professional cooking. Does the stove work? Is there adequate counter space? Enough refrigerator storage for a week's worth of meals?
- Building trust: This conversation establishes you as a professional who cares about details, not just someone who shows up and cooks.
- Vetting the client: Yes, you're vetting them too. Red flags in this conversation can save you from nightmare clients.
Format options: You can conduct consultations by phone (fastest), video call (lets you see the kitchen), or in-person at their home (ideal for first-time clients). Schedule it at least 7-10 days before your first service to allow time for menu planning and shopping.
Essential Questions to Ask
Come prepared with your standard questions. Take detailed notes—you'll reference them for every service with this client.
About Their Needs
Start with the basics: How many people are you cooking for? How many meals per week? What does a typical dinner look like for your family now? What's your biggest challenge with cooking—time, skill, energy, or something else?
Ask about their schedule: What day and time works best for weekly service? Will you be home during the service, or working independently?
These questions help you understand not just what they need, but why they're hiring you. Someone hiring you because they work 80-hour weeks has different needs than someone managing a chronic illness.
About Dietary Requirements
This section is critical—lives literally depend on accurate information here.
- Allergies: Ask specifically about food allergies, their severity, and any cross-contamination concerns. The difference between "I don't love shellfish" and "shellfish will send me to the hospital" is everything.
- Dietary restrictions: Are they following a specific diet (keto, paleo, diabetic, low-sodium, renal, heart-healthy)? Any religious or ethical restrictions? Foods anyone refuses to eat?
- Preferences: What cuisines do they love? How do they feel about spice? Any texture preferences or aversions (especially important for kids or seniors)? Do they prefer variety or are they fine eating the same meal 2-3 times?
About the Kitchen
Walk through their kitchen setup, even if it's virtual: What kind of stove (gas or electric)? How many burners work? Does the oven heat accurately? How much refrigerator and freezer space is available for storing prepared meals?
Ask about storage containers: "Do you have meal prep containers? If not, I recommend [specific type]—can you order about [X amount] before our first service?"
Confirm basics: Where is trash/recycling? Cleaning supplies? Any equipment that doesn't work or is off-limits? Any pets? House rules like shoes off or alarm codes?
About Payment and Logistics
Be clear about money upfront. Review your pricing: "My rate is [service fee] plus the cost of groceries, which typically runs [estimated range] for your menu."
Confirm their preferred payment method (Venmo, Zelle, check, etc.) and how you will handle grocery reimbursement.
Review the menu approval process: "I'll send your custom menu 7 days before each service. You'll have 48 hours to request changes."
Red Flags to Watch For
Not every inquiry turns into a good client. Watch for warning signs:
- Vague or constantly changing requirements suggest they don't actually know what they want—you'll never satisfy them.
- Unrealistic expectations for your rate mean they'll always feel overcharged, no matter how good your service is.
- A truly non-functional kitchen (no working stove, minimal counter space, hoarding situation) means you can't deliver quality service.
- Dismissing food safety concerns is dangerous. If they say "allergies aren't that serious" or wave off cross-contamination concerns, walk away.
- Rude or demanding tone during the consultation will only get worse once you're working for them.
Trust your gut. One difficult client can drain your energy and damage your reputation more than the revenue is worth. It's perfectly acceptable to politely decline if something feels off.
The Follow-Up
Within 24 hours of your consultation, send a follow-up email summarizing what you discussed: number of meals, servings, schedule, dietary requirements, and any important kitchen notes.
Include clear next steps:
- Review and sign the service agreement by [date]
- Send the deposit by [date]
- Order storage containers if needed
- Expect the menu for approval by [date]
Attach your service agreement and payment information.
If they don't respond within 48 hours, send a gentle follow-up. If red flags appear during the consultation, it's okay to politely decline: "After reviewing your needs, I don't think I'm the best fit for what you're looking for."
A thorough consultation is the difference between a smooth first service and a chaotic disaster. The 30 minutes you invest here saves hours of confusion, prevents mistakes, and builds client confidence.
Step 7: Creating and Presenting the Menu
Once you have a signed contract and deposit, it's time to create their first menu.
- Keep it manageable: Start with 3-4 dinner options. Don't overcommit on your first service. Choose recipes you've made before—this is not the time to experiment.
- Balance and efficiency: Mix proteins, vegetables, and starches. Vary cooking methods (one slow-cooked, one quick-sear, one roasted) so you can maximize efficiency by cooking multiple dishes simultaneously.
- Consider storage and reheating: Some dishes freeze better than others. Will it taste good after sitting in the fridge for 3-4 days?
- Present professionally: Send the menu 7 days before service (as specified in your contract). Include brief descriptions and list all major ingredients, especially potential allergens. Give them a clear deadline: "Please confirm or request changes by [date/time]."
Once they approve the menu, create your detailed shopping list organized by store section and confirm your service day/time 24-48 hours in advance.
Step 8: Your First Service

The consultation is done and the menu is approved. Today is service day—where you prove your worth and earn that glowing review.
Your goal: Deliver exceptional food, leave a spotless kitchen, and create a "wow" experience that turns this client into a referral machine.
The Shopping Trip
Shop morning-of for maximum freshness. Allow yourself 1.5-2 hours—you don’t want to feel rushed today!
Organize your list by store section (produce, meat, dairy, pantry) for efficiency. Bring insulated cooler bags—food safety starts in the parking lot, not the kitchen. Check every item for freshness and quality. Buy meat and seafood last to keep it coldest.
Keep all receipts organized and photograph them immediately (backup for reimbursement).
Pack Your Kit
Before you leave for service, pack everything you need:
- Professional knives (chef's knife, paring knife minimum)
- Digital instant-read thermometer
- Clean dish towels
- Measuring cups/spoons
- Grater, peeler, specialty tools
- Permanent marker and masking tape for labels
- Your recipes (digital or printed)
- Cooler with groceries
- Clean apron
- Phone charger
Review your cooking timeline: which dishes take longest? What can cook simultaneously? Build in 30-45 minutes for final cleanup.
Arrival and Setup
Be sure to arrive on time. Put on your apron, silence your personal phone, and take a breath—you've got this. When they answer the door, greet them warmly and confidently. Bring groceries in promptly (temperature control matters), making multiple trips if needed.
Quick orientation: If it's your first time in their kitchen, locate the refrigerator, stove/oven, sink, trash/recycling, and cleaning supplies. Confirm where they want finished meals stored. Ask about any quirks: "Does the oven run hot?" "Which burners work best?"
Set up strategically: Put perishables in the refrigerator immediately. Organize ingredients by meal. Set up your knife station at the primary workspace. Identify where they keep pots, pans, cutting boards, and mixing bowls.
Confirm the plan: "Just confirming: I'll be preparing [list meals], and everything will be labeled and ready in your fridge by approximately [time]. Does that still work?"
Set expectations: "I'll be here for approximately [X hours]. I'll clean as I go and leave your kitchen spotless. Feel free to go about your day—I'll let you know when I'm finishing up."
Read the room—some clients want to chat, others want you invisible. Adapt accordingly.
Work Systematically
Start with the longest-cooking items. Get the oven preheating if needed, and start dishes that take 60+ minutes first (braises, roasts, slow-cooked items). While those cook, prep other components.
Batch similar tasks: Chop all vegetables at once (organized by meal). Prep all proteins together (separate cutting board for raw meat). Make sauces or marinades in sequence. This is exponentially more efficient than prepping each meal individually.
Maximize your workspace: Use all burners if possible. Cook in the oven and on the stovetop simultaneously. Set timers for everything—don't rely on memory when you're juggling multiple dishes.
Food Safety is Non-Negotiable
Wash hands frequently, especially after handling raw meat. Use separate cutting boards for raw meat and vegetables. Clean as you go to prevent cross-contamination.
Check temperatures with your thermometer: Be sure that all meat is cooked to a safe temperature. Nothing will damage your reputation like undercooked chicken!
Cool food properly: Hot food must cool to below 40°F within 4 hours. Use an ice bath for faster cooling—place the pot or pan in a larger container with ice water, stirring occasionally. Never put piping hot food directly in the refrigerator.
Quality Control and Presentation
Taste everything before storing. Adjust seasoning—salt, pepper, acid. Make sure flavors are balanced and will hold up after 2-3 days in the fridge.
Portion accurately. If the client expects 4 servings per meal, deliver exactly that. Better to slightly over-portion than under.
Take photos of plated portions for your portfolio (ask permission first). Even though it's going in containers, make it look appetizing.
Label everything clearly: Every container needs dish name, date prepared, and reheating instructions. Use masking tape and permanent marker (sticky notes fall off). Place labels on lids so they're visible when stacked.
Example: "Herb Chicken & Roasted Vegetables | Prepared: 11/15/24 | Reheat: 350°F for 20 min (covered) or Microwave: 2-3 min, stirring halfway"
The Kitchen Must Be Spotless
A perfectly clean kitchen is part of your service—it's what justifies your premium rate. Clients remember cleanliness as much as they remember the food.
Your cleaning checklist includes:
Wash every dish, pot, pan, and utensil you used. Wipe down all counters, including under appliances you moved. Clean the stovetop thoroughly—burners, drip pans, control panel. Wipe the backsplash (it gets splattered even if you don't notice). Clean inside the microwave if you used it. Wipe cabinet fronts and handles.
Clean the sink thoroughly—no food particles, no grease film. Wipe faucet and handles.
Sweep or vacuum the kitchen floor. Check especially in front of the stove and sink. Spot-mop any spills or sticky spots.
Wipe refrigerator shelves where you placed meals. Organize meals neatly with heavy items on bottom.
Take out trash if full and replace the bag. Take out recycling if full.
Do a final walkthrough: Does the kitchen look as good or better than when you arrived? Check drawers and cabinets you used. Look at everything from the client's perspective.
The standard: Imagine the client will inspect with a white glove. That's your standard every time.
Step 9: Before You Leave (Closing Strong)

The food is in the fridge, and the kitchen is sparkling. You did it! Just a couple last things to leave a glowing impression in your client’s mind and set your business up for more success.
Show Them the Food
Find the client and offer to show them what you made. Open the fridge and point out each meal.
Briefly describe: "This is the chicken with roasted vegetables, this is the beef stir-fry..."
Review reheating instructions: "Everything has instructions on the label, but generally 350°F for 20 minutes covered, or microwave 2-3 minutes."
Mention any special notes: "The chicken is best if you let it sit out for 10 minutes before reheating—it'll heat more evenly."
Collect Payment
Don't be shy about this—it's a business transaction.
"The total today is [service fee of $X] plus [grocery reimbursement of $Y], which comes to [total of $Z]." Show the grocery receipt if they want to see it. Accept payment via your agreed method and provide a receipt or invoice immediately.
If you offered a discount contingent on a review: "As we discussed, your rate today was [discounted amount] in exchange for a Google review. Would you mind leaving that now while I'm here?"
Hand them your phone with the review page open or text them the link. Wait while they write it (friendly but firm—this was the agreement). Thank them genuinely once it's done.
Ask for Referrals
Plant seeds for referrals: "If you know anyone who might benefit from this service, I'd love a referral! I have [X] spots available for new clients." Offer a referral incentive, like $100 off their next service.
Schedule the next service
For recurring clients, get it on the calendar before you leave: "Same time next week? Perfect, I'll see you [day] at [time]. I'll send your menu for approval by [day]."
Make Your Exit
Gather all your belongings—knife kit, coolers, towels. Thank them warmly: "Thank you so much for trusting me to cook for you! I really enjoyed it." Express genuine enthusiasm: "Enjoy your meals this week!"
Leave on a professional, warm note.
The Follow-Up
Within 24 hours, send a thank-you message. Remind them of reheating instructions. If applicable, include the link to leave a Google review if they haven't yet.
Within 3-5 days, check in: "How are the meals? Any favorites so far?" This shows you care and opens the door for honest feedback.
Document everything for next time. What worked well? What did they love (make it again)? What didn't they finish (avoid next time)? Any adjustments needed? Kitchen quirks you learned? Their communication preferences?
This information makes every subsequent service smoother and more personalized.
You're Now a Working Personal Chef
Celebrate this moment—you've completed your first professional personal chef service!
Each service gets smoother. Client #1 tells 2-3 friends. Those friends check your Google reviews. You book clients #2, #3, and #4. Within 3-6 months, you have a waitlist.
Every successful personal chef started exactly where you are now—nervous about their first service, unsure if they could pull it off. The difference between those who succeed and those who quit is simple: they kept cooking.
Your first service is done. Now go book your second.